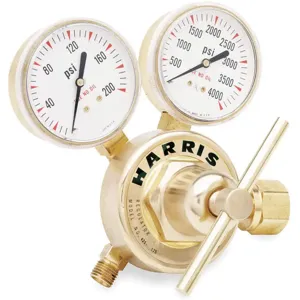
Harris 425-200-540 oxygen single-stage regulator offers accurate pressure regulation for welding, cutting and brazing applications. The regulator ensures that the pressure of the gas is kept at a safe and consistent level for the specific application, allowing for precise control and optimal performance.
Features:
- It has a one-piece encapsulated seat design with an internal filter and a PTFE Teflon seat to resist corrosion, tearing and wearing.
- This regulator features a brass bonnet & body for improved flow control.
- It has a bronze adjusting screw for easy regulator adjustment.
Standards and Approvals:
Frequently Asked Questions:
Q. How much inlet and outlet does this regulator have?
A. This regulator has a 540 CGA-inlet and a minimum 9/16 inch right-hand outlet along with a self-reseating HP safety valve (internal) for enhanced safety.
Q. How to clean Harris 425-200-540 oxygen regulator?
A.
- Turn off the oxygen supply and disconnect the regulator from the cylinder valve.
- Disassemble the regulator and clean the body and internal components with a clean, lint-free cloth, soft-bristled brush and compressed air.
- Wash the components with mild soap and water, rinse thoroughly and dry completely.
- Apply a small amount of lubricant to the O-ring or other sealing components.
- Reassemble the regulator and ensure all components are securely fastened.
- Test the regulator to ensure it's functioning properly.
Q. How to install this oxygen regulator?
A.
- Ensure the cylinder valve is closed.
- Remove the protective cap from the cylinder valve and check the valve outlet to ensure it is free from damage or debris.
- Match the regulator fitting to the cylinder valve. Harris 425-200-540 regulator has a CGA 540 connection, so make sure the cylinder valve has a matching CGA 540 connection.
- Attach the regulator to the cylinder valve by positioning the regulator over the cylinder valve and hand-tightening the regulator yoke screw or T-handle onto the cylinder valve. Use a wrench to tighten the regulator an additional 1/8 to 1/4 turn.
- Slowly open the cylinder valve by turning the handle counterclockwise. This allows the oxygen to flow into the regulator.
- Adjust the regulator by turning the regulator adjustment screw counterclockwise to increase the pressure or clockwise to decrease the pressure until the desired delivery pressure is reached.
- Attach the oxygen hose to the regulator outlet and ensure it is securely fastened.
- Turn the regulator adjustment screw counterclockwise to increase the delivery pressure slightly and listen for any hissing sounds that indicate a leak. Use a leak detection solution to check for any leaks around the fittings.
- Once you have confirmed that there are no leaks, you can use the oxygen for your intended application.


